Saturday, October 29, 2005

Alright so check it out... the possibilities for colors are endless. I tried to go ugly here... Thursday I fixed the tube to the upper part of the beak with epoxy clay. I had to redrill the holes in the head for the up and down pivoting motion (the originals were too high up). Then, I sealed the head with plaster. The picture on the left gives you an idea of the puppet puking. YAY for puke.


Wednesday, October 26, 2005

Tuesday I made a pivot rod for the head of the mother. She will be stationary at the back of the stage and her head will bend foreward so that she can vomit into the mouths of the children. I made a hook on the back of her head to pull it into an upright position. Also, for more control, I drilled holes in the back to hold the wire for the eye mechanism and another hole for the string that controls the mouth movement. Then I drilled a dowel and epoxied it the the end of the eye mechanism's wire so that I could extend the range. For the eyes I used balls of epoxy clay. By tomorrow the things will have dried and I will be able to seal her up and get her paper mached. That shouldn't take long at all, so tomorrow I plan on spending time on the set or helping out with the other puppets. Oh yeah and the best part about the mom puppet is that her hose is in place... so let the vomiting begin!

Sunday, October 23, 2005


I played around with some colors in photoshop. I drew some inspiration from the zebra finch and combined it with the features of other finches I liked. We don't have to use anything like this at all. From here we can decide what we like and what we don't like and we can come up with how we want the characters to look.

Thursday, October 20, 2005


So today I cut open my plaster head and worked on making the mouth open and eyes move. For the mouth, I drilled 2 holes through the plaster beak I made. Then I put a wire through it and marked where I needed to drill holes on the cheeks of the puppet. I drilled the holes and the mouth didn't seem to fit right, so I drilled 2 more below them. Then I attached a hook to the back of the mouth with epoxy clay. After that dried I tied a string around the hook and found the angle that allowed for the best motion.

I think the dad's head didn't work because the wood isn't long enough for the mouth to attach to the sides. Also, it needs to be controlled from underneath, so I'm not sure if it will work as it is.

For the eyes, I cut slits in the plaster and made a wire contraption inside. Two wires, which controlled the eyes were hooked around a third wire that comes out the back to control it. The eyes don't move predictably. I think it will add to the character though. I need to make something that causes the head to lift and tilt. This will work like the mouth. I may try to stop in this weekend and try to do it. We only have 4 weeks left, so we need to probably start dedicating some outside time to this.

Tuesday, October 18, 2005


Here are some pictures I took of the group during today's class. We have finally made all the bird heads! We did the whole plaster gauze over clay thing. After the plaster dried, we cut the heads in half and scooped the clay out. Then we used plaster to patch up. So now we have quite a few hollow heads.. and an egg ready for paper mache. We decided to make them all look similar by giving them all big noses and cheeks. After that, personal interpretation was key... and I think we all did a really good job creating expressive characters. We made separate beak attachments so that we can drill a hole in the plaster and control the mouth movement, but most of our mouths didn't fit... maybe we will have to use epoxy clay for these parts.

Thursdays class will be paper mache and body making.

Thursday, October 13, 2005


Here are some of the pictures I got from today's class... one is of the plaster objects my group made and the other is of the couch and chair we are using in our set.
Here's some story line we got: The children have been sent home from school for flying. The opening scene is them returning home from school and arguing over how to tell their father. There will be heated debate. Then, the tv says that a hurricane is coming and everyone should evacuate. So all the birds fly away. The end.

Wednesday, October 12, 2005

In class Tuesday we spent our time building the set. We covered a styrofoam chair in cheap fabric remnants from Walmart. Metal wires held the fabric in place well, but we soon figured out that hot glue was faster and more sturdy. We are going to cover the floor in hay (or other various nest materials). I was brainstorming about our sitcom idea and this is what i came up with...
- family sitcoms usually address some type of moral issue: I'd like to see our characters dealing with one of these issues in a really cheesy way
- I watched "that 70s show" and realized that laugh tracks are pretty important to sitcoms. They seem to make the quiet moments flow faster and give a sense of presence.

I've got a contraption that may make our mother bird vomit. It's an empty party ball with a pump tap.... I'm not too sure if it will work.

Friday, October 07, 2005


Above is my aerial photograph.

To the right is a picture of everyone trying to hold the kite steady to attach the rig and get it up in the air.

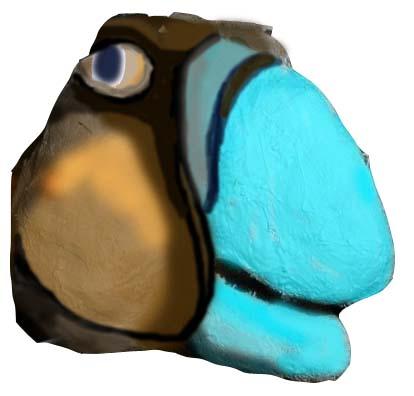
To the left is my shadow puppet from last Thursday, I don't think Arturo got a picture of it. My strings really got mixed up. They were supposed to control the movement of the tail,
the wing, and the beak.

Right: The rig is in the air!


Below shows some examples of the brainstorming going on with my group. We played with clay to get an idea of what we wanted the birds to look like last Thursday.
I missed class on Tuesday, but made up the work this Thursday by covering a clay face with plaster- gauze. I think the rest of my group is probably sick like me... hopefully we'll be able to all get together soon. Anyway, Thursday we made a stage from the big box in class. We decided to make a shadow puppet stage above the actual stage. We dismantled one of the screen things and scrapped it for the cloth and parts. That may solve our dilemma with the shadow puppets . We used some styrofoam from inside the box to make a couch. We also decided to make the stage have 3 different levels. The back will be the mom and the kitchen. The middle is where action will take place, and the front is where the couch will hang out. Next class we will probably spend constructing the stage more. I will bring in some pieces of cloth for our set on Tuesday.